Table of Contents
PPro8 Keyboard Setup
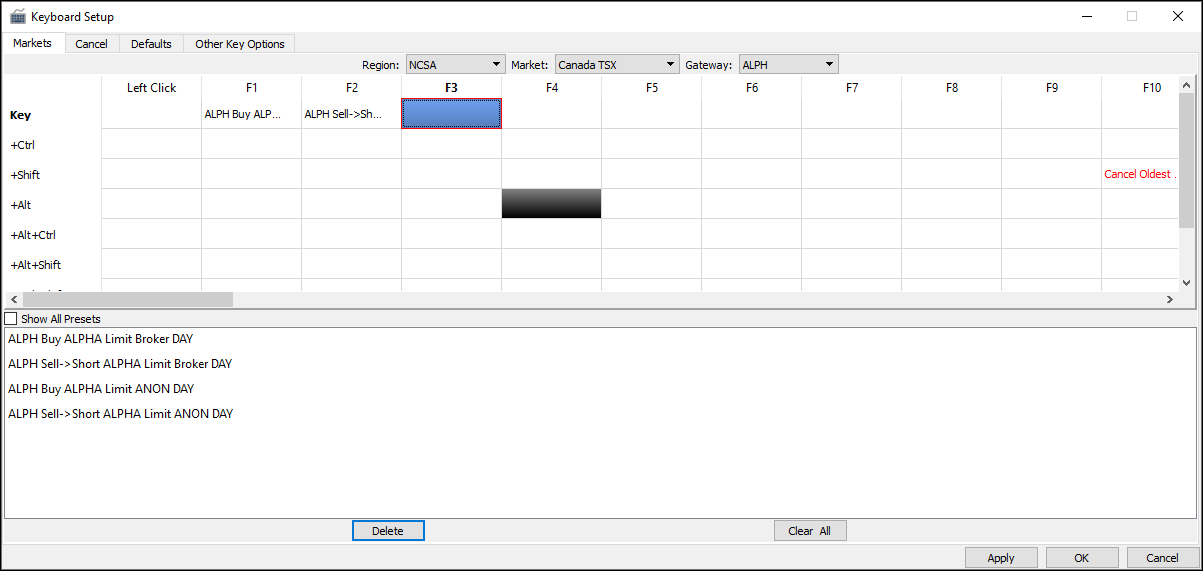
With the PPro8 Keyboard Setup, you can set up keyboard shortcuts for a single order, a list of orders, and scripted orders.
Open Keyboard Setup
1. On the PPro8 toolbar, click Keyboard Setup.

2. The Keyboard Setup window appears.
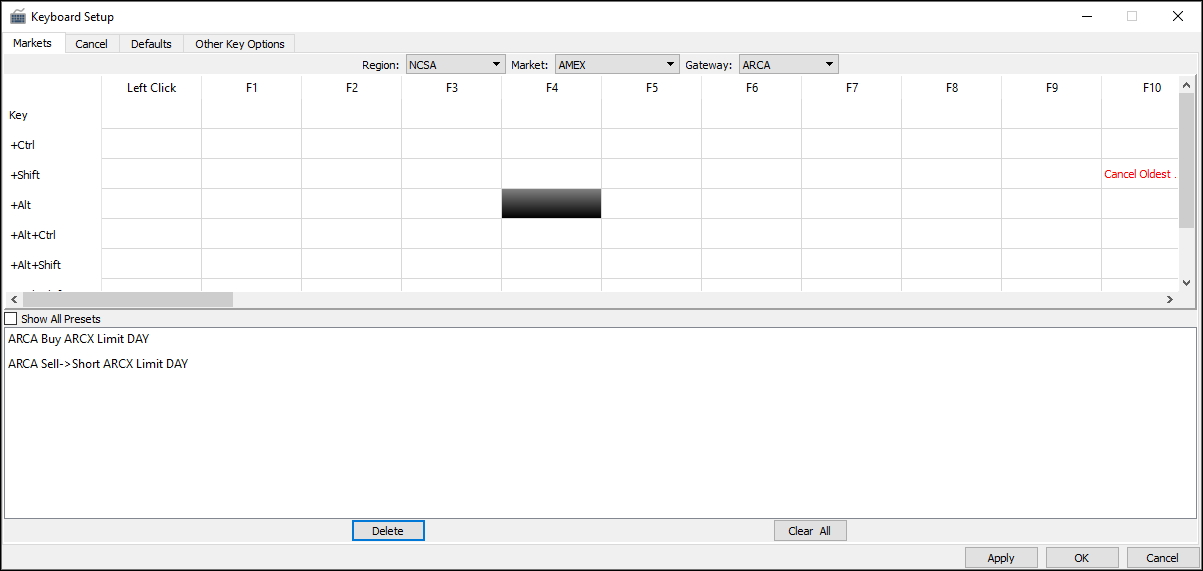
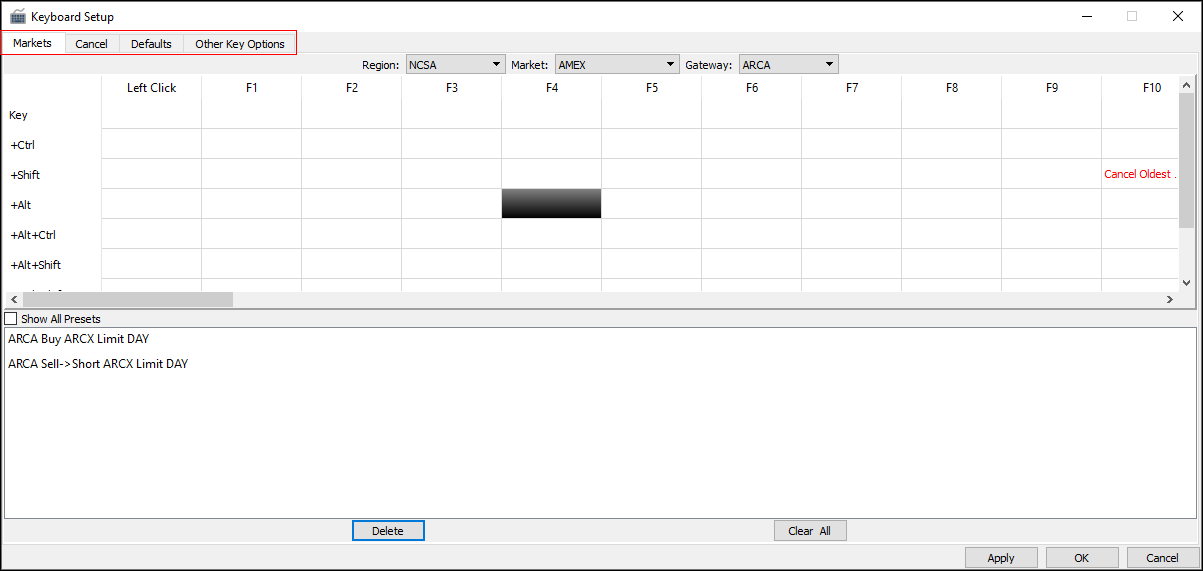
The Keyboard Setup window contains four tabs: Markets, Cancel, Defaults, and Other Key Options.
Markets
Use the Markets window to set up keyboard shortcuts for single orders, a list of orders, and script orders for each region and market you want to trade.
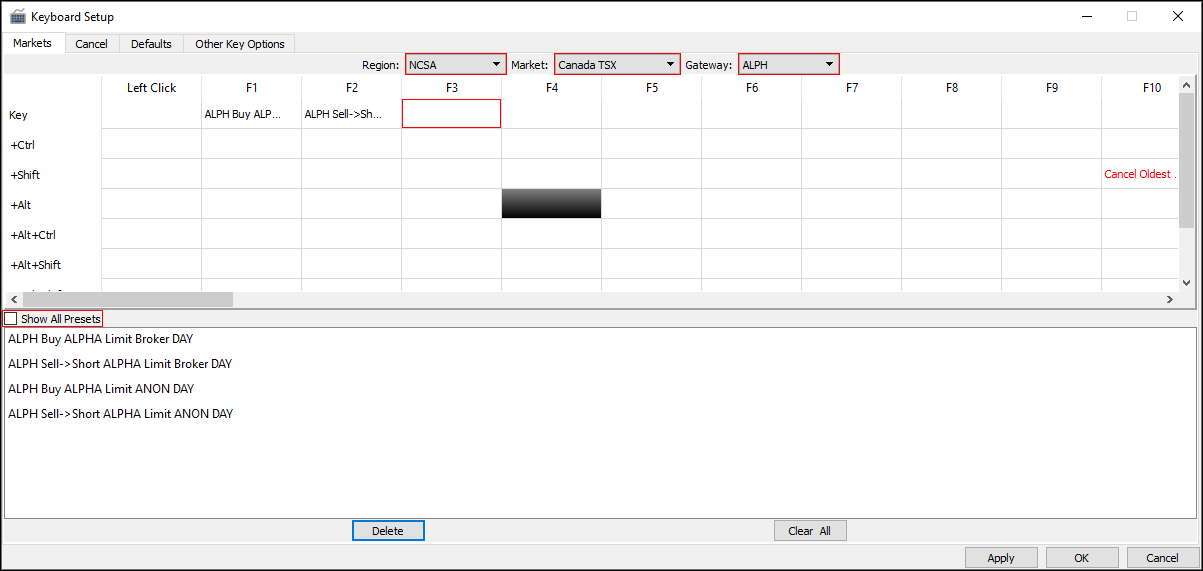
- Region: the region where the market is located
- Market: after you click the region, click the specific market where the keyboard shortcut applies
- Gateway: click the gateway you want to use for this keyboard shortcut
- Show All Presets: select or clear the check box to show Basic Presets or All Presets, and then click an item in the list to use a preset order type
- Order Setup Dialog: double-click a blank cell to open the order editor window

- Single order: click this option to set up a keyboard shortcut for a single order
- Order list: click this option to set up a keyboard shortcut for a list of predefined orders
- Script order: click this option to set up a keyboard shortcut for a scripted order
- Order Name: type a specific name for an order to identify it
- Show Order Edit Box: select this check box to show the order edit box when you click the keyboard shortcut
- Show Order Edit Box For Flattening: select this check box to show the order edit box when you create a keyboard shortcut for a Flattening order; selecting this check box will allow you to to edit the percentage before it is sent from the Stock Window
- Order configuration box: use this box to set the following order characteristics:
- Side: click Buy or Sell→Short
- Destination: click the market or exchange where the order is to be sent
- Order Type: automatically set to Limit
- Reference Side: click to set whether the order price follows the near or far side of the Level 1 quote
- Price Adjust: type a price adjustment amount for a Limit order type on the reference price
- Setting a price adjustment on Limit orders allows the trader to adjust the limit price to help ensure execution. On the Buy or Sell side, a positive price adjustment increases the limit price of the order, while a negative price adjustment decreases the limit price of the order
- TIF (Time in Force): click the TIF for the order, such as Day, IOC, GOC, or FOK
- Reserve: click to set whether to show the entire order size or a portion of the order size
- Display Size: if you click Yes in Reserve, you can then type the amount of the order size to be displayed in the lit market
- To save the new keyboard settings, click OK.
Set up Click-to-Trade function
You can set up the Click-to-Trade function for trading in the Stock Window using mouse clicks. To use this function, follows these steps.
Note: whatever you set as the left-click will be the buy or the sell instruction. If you click on the left side (bid) of the Stock Window, it will send a sell/short sell order. If you click on the right side (ask) of the Stock Window, it will send a buy order. The order can be sent at any price(s). It will execute as a market order if you send it at a more aggressive price.
1. In the Keyboard Setup window, click a Region, Market, and Gateway.
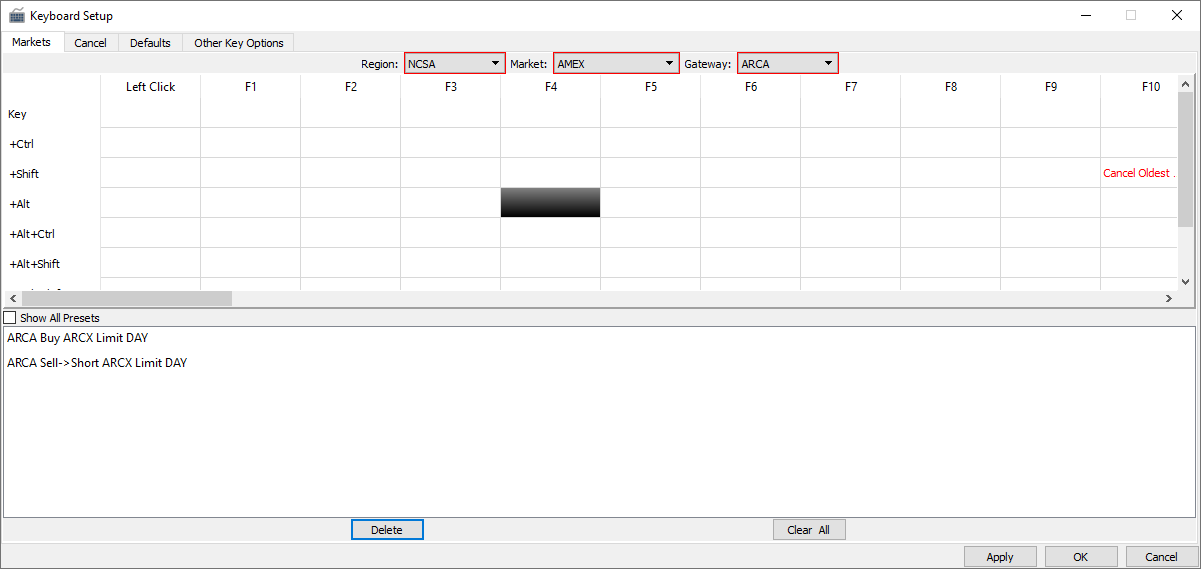
2. Double-click the Left Click cell.
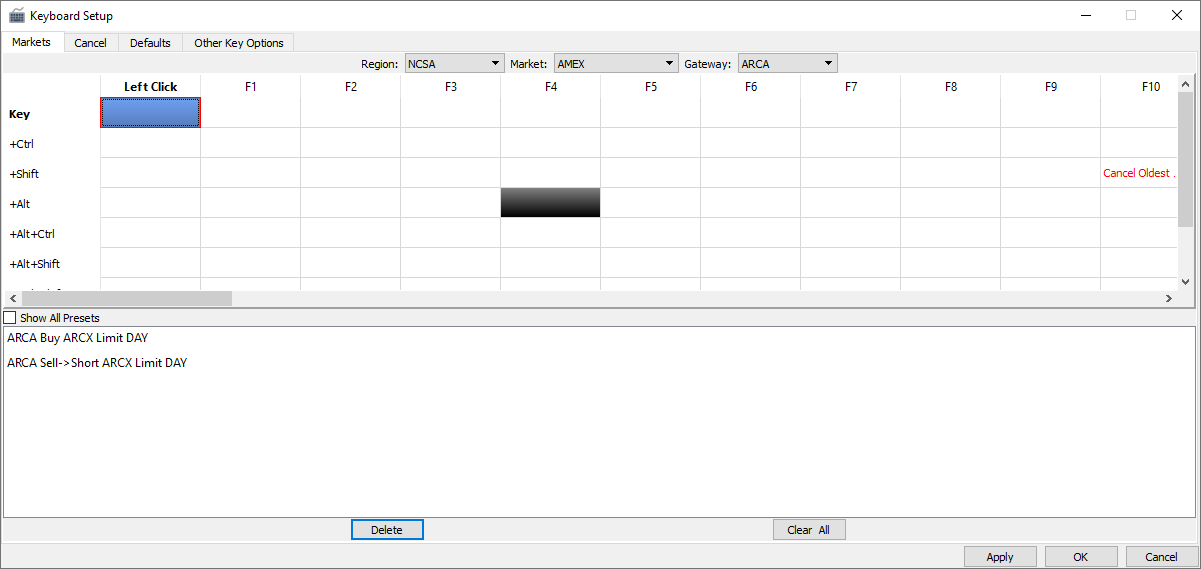
3. The Order Setup Dialog window appears.

4. Click or type values in the order fields, and then clear the check box for the Show Order Edit Box option.

5. Click OK.

6. In the Stock Window, left-click on the Price column in the Stock Window to set the order by price. Left-click on the Total column to set the order by size.
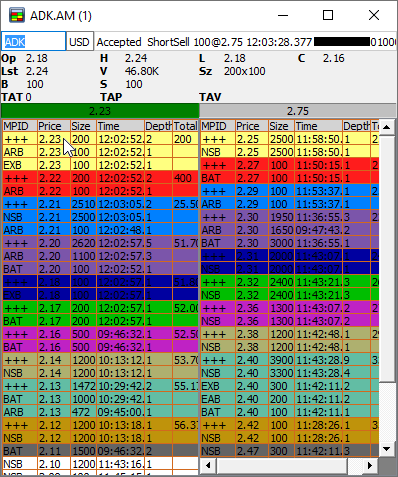
7. Press Enter.
8. The order is sent.
Pegged/Midpoint Order
To try and get a midpoint fill, the trader needs to input the full limit price for the pegged order. Namely, the bid price for a sell, and vice versa: the ask price for a buy.
If the stock price levels remain constant, the order will stay posted and looking for midpoint liquidity to fill at half-tick.
However, if the price levels later break your order's limit price, then the order may fill at the full price.
Stop/Conditional Orders
Warning: when using Script Stop/Trailing Stop orders, keep in mind that all risk checks (buying power, orders per side, short-sell) are performed at the time the order is triggered, NOT at the time it is entered.
Script orders are stop-loss orders. These orders are instructions to submit a buy or sell order if the user-specified stop trigger price is reached.
Set up a script order
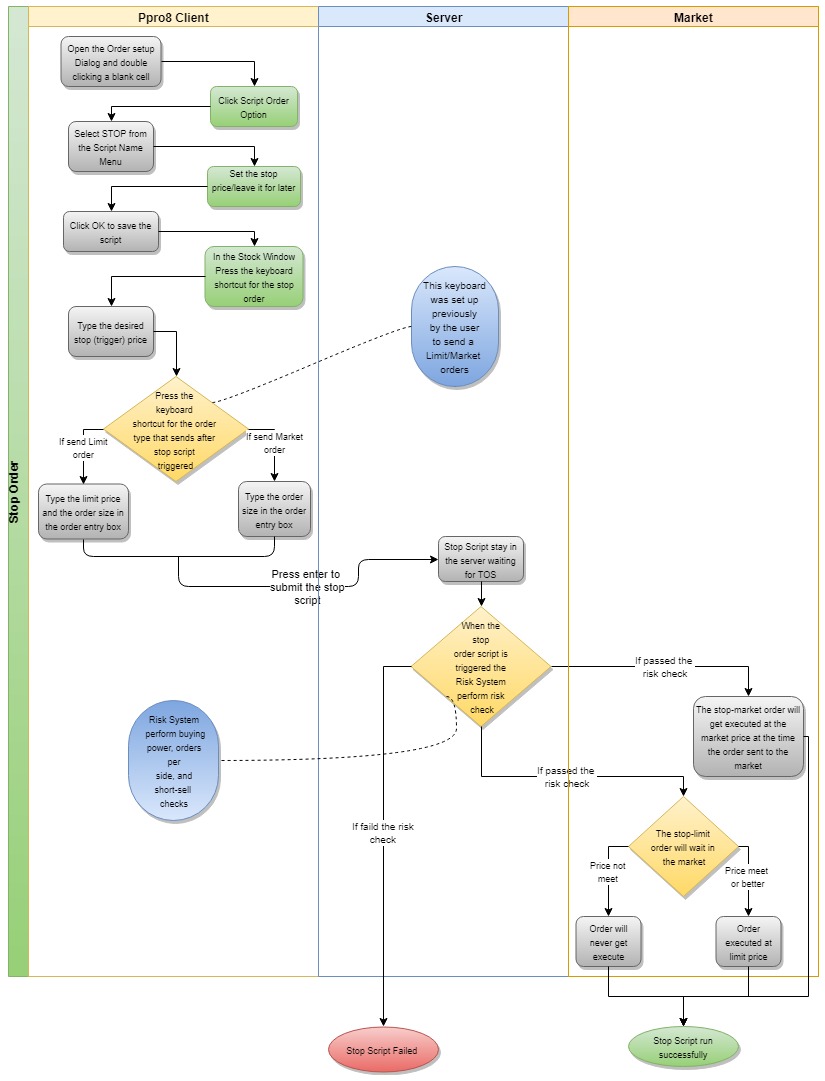
1. Open the Order Setup Dialog window by double-clicking a blank cell.
2. Click the Script Order option to open the script order edit window.

3. From the Script Name menu, if Stop is selected, the price can be set in the empty field or left blank (you can set the stop price later, when you send the order). You can also configure the Reference Price and Trigger Type settings.
If Trailing Stop is selected, Reference Price, Offset Type, and Increment Type can be chosen. The empty fields can be filled in or left blank (you can set the Trail Offset and Trail Increment values when you send the order as well).

4. Click OK to save the script.

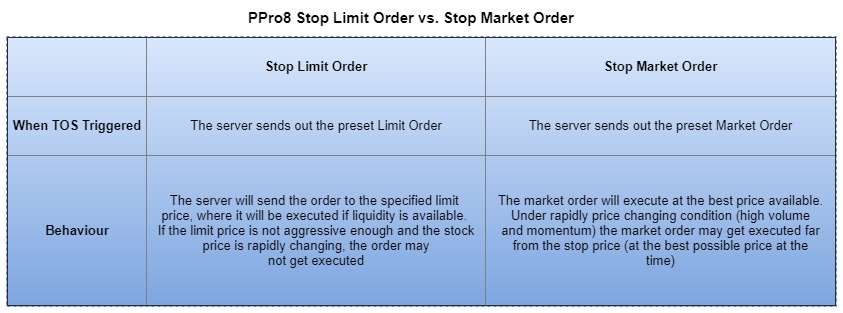
A stop order stays in the server and becomes a marketable order when the stock price moves above (stop buy order) or under (stop sell order) the stop price. A trailing stop order also stays on the server and becomes a marketable order when “upfrombottom” or “downfromtop” exceeds the “trailing offset” amount.
New: there are now more options available for trailing stop orders in the Order Setup Dialog window, including:
- Reference Price
- Offset Type (Numeric, Percentage, Number of Ticks)
- Increment Type (None, Numeric, Percentage, Number of Ticks)
Send a stop order
1. In the Stock Window, press the keyboard shortcut for the stop order.
2. The stop price box appears below the quotes. Type the desired stop (trigger) price.
Note: if you are using Percentage or TickSize as the trigger type (instead of Numeric), the value you input there would represent the percentage or the number of ticks, respectively.
3. Press the keyboard shortcut for the order type necessary (Buy or Sell) when the stop price is reached.
4. In the limit box, type the limit price of the order you wish to execute upon the stop price being met.
5. Press Enter to submit the stop order. The order stays on the Script Server until the trigger price is reached, which will be identified by the Time of Sales, and then the pre-defined order is sent to the gateway.
For example, you have a long position of TD.TO at 54.26. You wish to exit if the stock drops to 54.19. In order to accomplish this, your stop price would be set to 54.19.
To exit the trade, your limit price would be set below 54.19, for example, 54.15. This will send an order to the market for 54.15 when the stop of 54.19 is met. A trader can set the limit further from the stop price to ensure the likelihood of a fill in the event of rapid price movement.
Send a trailing stop order
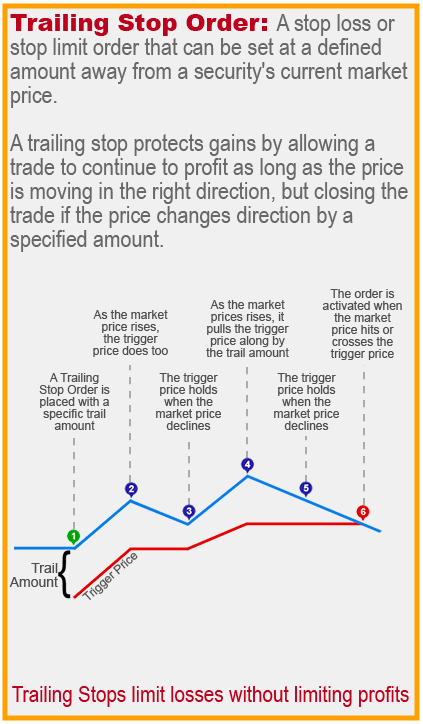
New: there are now more options available for trailing stop orders in the Order Setup Dialog window, including:
- Reference Price Options:
- This will allow the trader to specify what price they want to base the triggering event on. This provides greater control over the previous implementation where it was just LastPrice (last print on TOS), now they can also use the current Bid / Ask / Midpoint. Example: Reference Price is set to 'Ask' and for Offset Type, 'TickSize' is chosen. Symbol ABC, with tick size of 0.05, is at 35.05 Bid and 35.10 Ask. When entering a trailing stop order, the trader inputs a value of 4 into the tick offset, and the trailing stop would thus be 0.20 away from the Ask price.
- Offset Type:
- This will allow the trader to specify whether the offset is specified as a numeric, percentage, or number of ticks value. This gives traders greater flexibility when trading instruments with different tick sizes or pricing.
- Note: the offset specifies how far from the best price the price must move before triggering the trailing stop. Example: if the user is trading symbol ABC, and the Bid is at 80.00 at the time of the trailing stop entry, if the trader selects to place to a trailing stop at a 1% offset from the Bid price, then the trailing stop would be 0.80 away from the Bid price.
- Increment Type:
- This will allow the trader to specify (if desired) how far the security being traded must move before the trail amount (offset) adjusts itself. This value can be set to None (no increment) or as a numeric, percentage, or number of ticks value. For example: if stock ABC is trading at 80.00 and the user enters a trailing stop with a trail offset of 1.00 and a trailing increment of 0.25, the stop price would begin at 79.00. If the stock moved up to 80.20, the stop price will still be at 79.00. However, if the stock moves up to 80.25, then the stop price will adjust to 79.25.
1. In the Stock Window, press the keyboard shortcut for the trailing stop order.
2. The Trail Offset and Trail Increment boxes appear below the quotes.
3. Press the keyboard shortcut for the order type when the trigger price is reached. For example, if TD.TO (with a tick size of 0.01) is trading at 54.26 and you want to sell when it drops 0.27, use your ALPHA limit sell key and type a marketable limit price of 53.95 to ensure a fill.
4. Type the Trail Offset for the trailing stop order. For example, you want to send an ALPH limit order to sell 100 shares of TD.TO when the price has declined a certain amount (0.27 in this case). You would enter 0.27 for Trail Offset if you set it as Numeric, 0.5 if set as Percentage, or 27 if TickSize was chosen. These would all be based on LastPrice selected for Reference Price.
5. Enter the Trail Increment for the trailing stop order. In our example above, when the price rises you want the stop to only move in 0.05 increments, type 0.05 for Numeric, 0.1 if set as Percentage, or 5 if TickSize was chosen. If None was selected then the increment will be 1 tick.
6. Press Enter to submit the trailing stop order. The order stays on the Script Server until the trigger price of 0.27 below the Last Price when the order was sent or last increment move is reached, and then the predefined order is sent to the gateway.
Bracket Orders
Overview
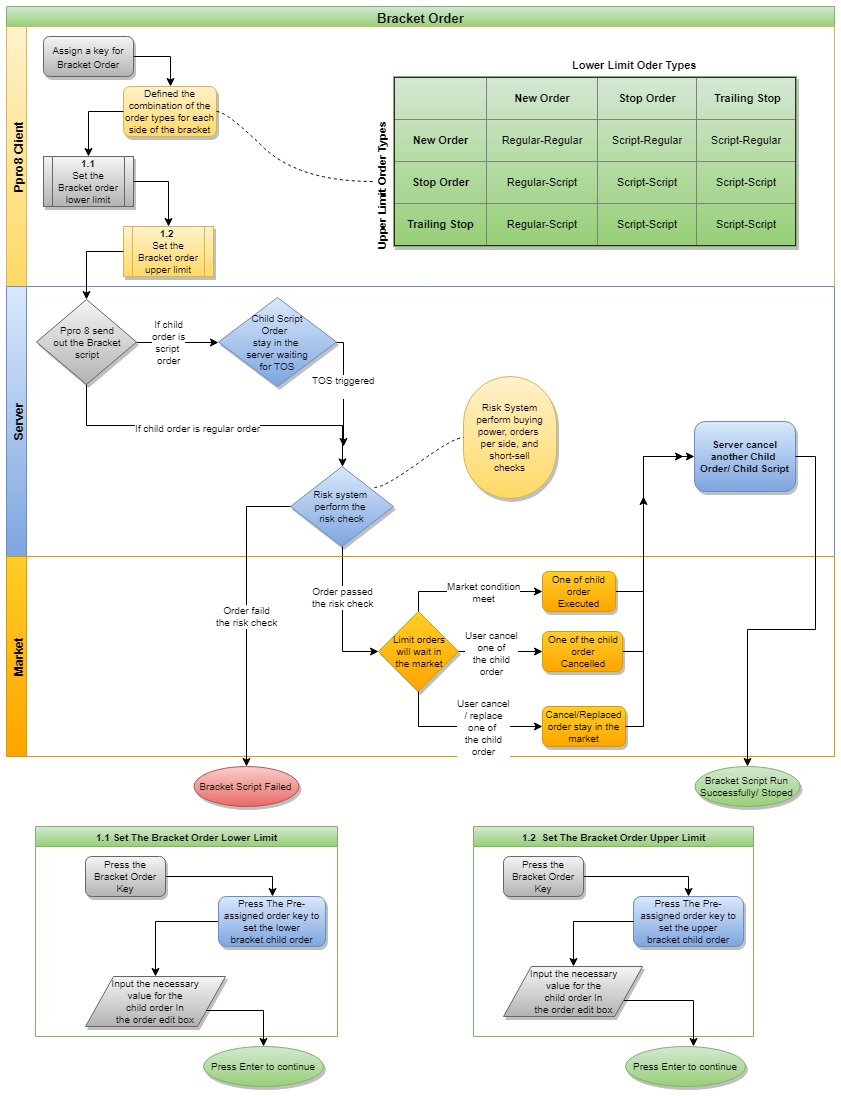
Bracket Orders are a script order type that can be used for entering new positions as well as managing existing positions. They are designed for limiting loss and locking in profit by placing a ‘bracket’ on an order, with two orders. For example, a buy order can be bracketed by a high-side sell order and a low-side sell stop order. You can set any combination of buy or sell orders within a bracket.
The naming convention for the two parts of the order is as follows:
- Bracket Low Limit (lower bracket) - where the user inputs desired order for the lower part of the bracket
- Bracket Up Limit (upper bracket) - where the user inputs desired order for the upper part of the bracket
Note: the two parts of the order are not named ‘stop-loss’ and ‘profit-taker’ because that would assume that the bracket is tied to an underlying position, which is not always the case.
There are nine bracket types (order combinations) to choose from, as follows:
upper: New Order | lower: New Order
upper: New Order | lower: Stop
upper: Stop | lower: New Order
upper: New Order | lower: Trailing Stop
upper: Trailing Stop | lower: New Order
upper: Stop | lower: Stop
upper: Stop | lower: Trailing Stop
upper: Trailing Stop | lower: Stop
upper: Trailing Stop | lower: Trailing Stop
Note: for the above order combinations, “New Order” refers to a normal order (Limit, Market, etc.) sent without a trigger price, i.e., not a stop order or a trailing stop order.
Note: when it is part of a bracket order, a stop order appears as “Swift Stop” in PPro8.
Configure a Bracket Order
1. In Keyboard Setup, double-click a blank cell to open the Order Setup Dialog window.

2. Click the Script Order option to open the script order edit window.

3. In the Script Name menu, click Bracket Order.

4. In the Bracket Low Limit menu, click an order type (New Order, Stop Order, or Trailing Stop).

5. In the Bracket Up Limit menu, click an order type (New Order, Stop Order, or Trailing Stop).

6. Click OK.

7. The Bracket Order script for the key is set.
Send a Bracket Order
1. In Stock Window, press the key for the Bracket Order (for example, F3).
2. The Bracket Order comment for the lower component appears (for example, Bracket Order Lower Limit (New Order)).
3. Press the pre-assigned key for the order you wish to set as the lower component (for example, F1).
4. The Order Edit Box appears.
5. Type the desired price and shares for the lower component order, and then press Enter.
6. Press the key for the Bracket Order (for example, F3).
7. The Bracket Order comment for the upper component appears (for example, Bracket Order Upper Limit (Stop Order)).
8. Press the pre-assigned key for the Stop Order (for example, F4).
9. The Order Edit Box appears with the Stop Price field.
10. Press the pre-assigned key for the order (Buy or Sell) you wish to set as the upper limit (for example, F2).
11. The Order Edit Box updates to also show the Limit Price and Shares fields.
12. Type the desired stop (trigger) price and the limit price and shares of the order you wish to execute upon the stop price being met.
13. Type the desired price and shares for the upper component order, and then press Enter.
14. The Bracket Order script is set.
15. When the lower or the upper limit is reached, the order gets filled, and the opposite order component gets cancelled automatically.
Bracket Order entry behavior
- If you wish to adjust any of the parameters of the bracket order, then the entire bracket must be cancelled and re-entered.
- If you cancel any one of the bracket's two orders, then the whole bracket will cancel.
- To cancel a bracket order, click the corresponding row in History Log, and then press Esc.
- If you have cancel/replaced any one of the bracket's two orders, then the BracketOrder script will be stopped and the system will only keep the cancel/replaced order.
- If the bracket order script ran successfully, then the order will be cancelled automatically.
Cancel
Use the Cancel window to set up keyboard shortcuts for cancelling certain orders.
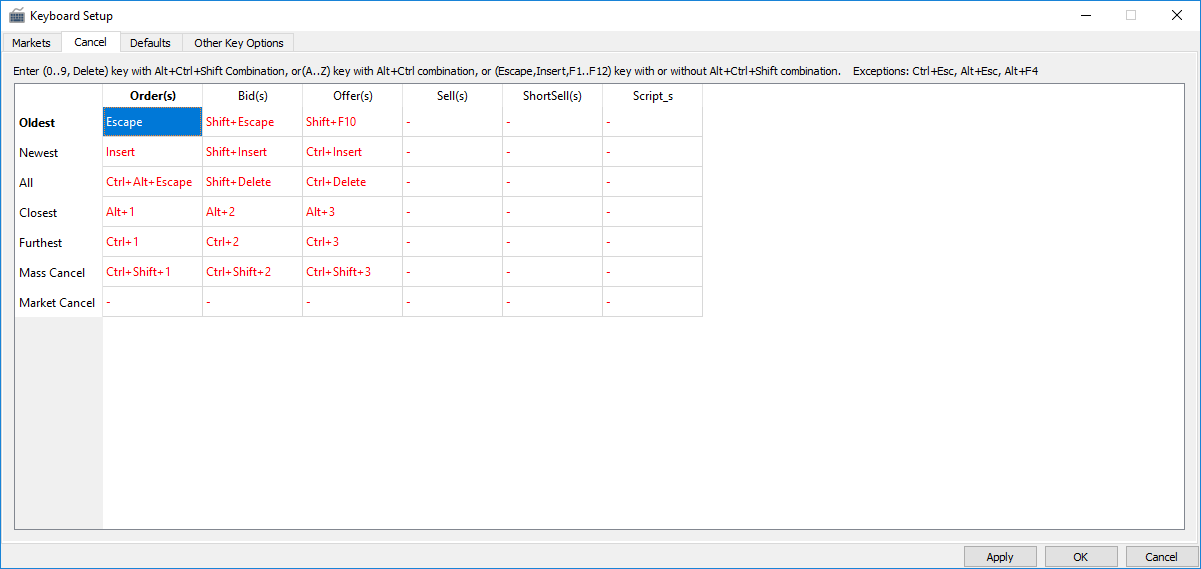
- The system has preset default keyboard shortcuts to cancel certain orders.
- Click the cell for a given order configuration, and then press a new key combination to set a new keyboard shortcut.
- You can set keyboard shortcuts to cancel all running scripts for all regions/asset classes.
- Delete Custom Cancel keys using “-” key.
Cancel Key Guide
- Cancel Oldest Order: Cancels the oldest pending order on that stock= Assigned key “Escape”.
- Cancel Oldest Bid: Cancels the oldest bid order on that stock= Assigned key “Shift+Escape”.
- Cancel Oldest Offer: Cancels the oldest offer (Short Sell or Sell) order on that stock= Assigned key “Shift+F10”.
- Cancel Oldest Sell: Cancels the oldest Sell order on that stock= Assigned key “None”.
- Cancel Oldest ShortSell: Cancels the oldest Short Sell order on that stock= Assigned key “None”.
- Cancel Oldest Scripts: Cancels the oldest script order on that stock= Assigned key “None”.
- Unordered List ItemCancel Newest Order: Cancels the most recent order on that stock=Assigned key “Insert”. * Cancel Newest Bid: Cancels the most recent bid on that stock=Assigned key “Shift+Insert”.
- Cancel Newest Offer: Cancels the most recent offer(Short Sell or Sell) on that stock=Assigned key “Ctrl+Insert”. * Cancel Newest Sell: Cancels the most recent Sell on that stock=Assigned key “None”.
- Cancel Newest Short Sell: Cancels the most recent Short Sell on that stock=Assigned key “None”. * Cancel Newest Script: Cancels the most recent script on that stock=Assigned key “None”.
- Unordered List ItemCancel All Order(s): Cancels all orders on that stock=Assigned key “Ctrl+Alt+Escape”.
- Cancel All Bid(s): Cancels all bids on that stock=Assigned key “Shift+Delete”.
- Cancel All Offer(s): Cancels all offers(Short Sell or Sell) on that stock=Assigned key “Ctrl+Delete”.
- Cancel All Sell(s): Cancels all Sell orders on that stock=Assigned key “None”.
- Cancel All Short Sell: Cancels all Short Sell orders on that stock=Assigned key “None”.
- Cancel All Script: Cancels all scripts order on that stock=Assigned key “None”.
- Unordered List ItemCancel Closest Order: cancels the order (bid or offer) closest to the level 1 price on that stock=Assigned key “Alt+1”.
- Cancel Closest Bid: cancels the bids closest to the level 1 price on that stock=Assigned key “Alt+2”.
- Cancel Closest Offer: cancels the offer(Short Sell or Sell) closest to the level 1 price on that stock=Assigned key “Alt+3”.
- Cancel Closest Sell: cancels the Sell closest to the level 1 price on that stock=Assigned key “None”.
- Cancel Closest Short Sell: cancels the Short Sell closest to the level 1 price on that stock=Assigned key “None”.
- Cancel Closest Script: cancels the script closest to the level 1 price on that stock=Assigned key “None”.
- Unordered List ItemCancel Furthest Order: cancels orders furthest to the level 1 price on that stock=Assigned key “Ctrl+1”.
- Cancel Furthest Bid: cancels the bid furthest to the level 1 price on that stock=Assigned key “Ctrl+2”.
- Cancel Furthest Offer: cancels the offer(Short Sell or Sell) furthest to the level 1 price on that stock=Assigned key “Ctrl+3”.
- Cancel Furthest Sell: cancels the Sell furthest to the level 1 price on that stock=Assigned key “None”
- Cancel Furthest ShortSell: cancels the Short Sell furthest to the level 1 price on that stock=Assigned key “None”
- Cancel Furthest Script: cancels the script furthest to the level 1 price on that stock=Assigned key “None”.
- Unordered List ItemMass Cancel Order(s): Cancels all orders=Assigned key “Ctrl+Shift+1”.
- Mass Cancel Bid(s): cancels all bids=Assigned key “Ctrl+Shift+2”.
- Mass Cancel Offer(s): cancels all offers(Short Sell or Sell) =Assigned key “Ctrl+Shift+3”.
- Mass Cancel Sell(s): cancels all Sells=Assigned key “None”.
- Mass Cancel Short Sell(s): cancels all Short Sells=Assigned key “None”.
- Mass Cancel Script(s): cancels all scripts=Assigned key “None”.
- Unordered List ItemMarket Cancel Order(s): Cancels all orders on Market=Assigned key “Alt+Shift+1”.
- Market Cancel Bid(s): cancels all bids on Market=Assigned key “Alt+Shift+2”.
- Market Cancel Offer(s): cancels all offers(Short Sell or Sell) on Market=Assigned key “Alt+Shift+3”.
- Market Cancel Sells(s): cancels all Sells on Market=Assigned key “None”.
- Market Cancel Short Sells(s): cancels all Short Sells on Market=Assigned key “None”.
- Market Cancel Script(s): cancels all scripts on Market=Assigned key “None”.
Set up FlatStop script order
New: you can now set up a FlatStop script order, which combines a Stop script with a Flatten Position script. To use this function, follow these steps.
1. In Keyboard Setup, configure a Stop Script keyboard shortcut (e.g., F1).
2. Also in Keyboard Setup, configure a FlattenPosition Script keyboard shortcut with a percentage of your choice and enable the “Show Order Edit Box For Flattening” (e.g., F2 with 50%).
3. In the Stock Window, you would then press F1, set a trigger price, then press F2, and then press Enter.
4. The PPro8 client will then send the order request to the server. When the price triggers, 50% of the trader's position will be flattened.
Set up Market Cancel order keyboard shortcut
You can set up a Market Cancel order to request a cancel for all orders on the market of the symbol loaded in the Stock Window. To use this function, follow these steps.
1. In the Keyboard Setup window, click the Cancel tab.
2. In the Market Cancel row, click a cell.
3. Type a keyboard shortcut.
4. Click OK.
5. The Market Cancel keyboard shortcut is set.
Defaults
Use the Defaults window to set up the order name convention as well as the price adjustments for Stop Order Types.
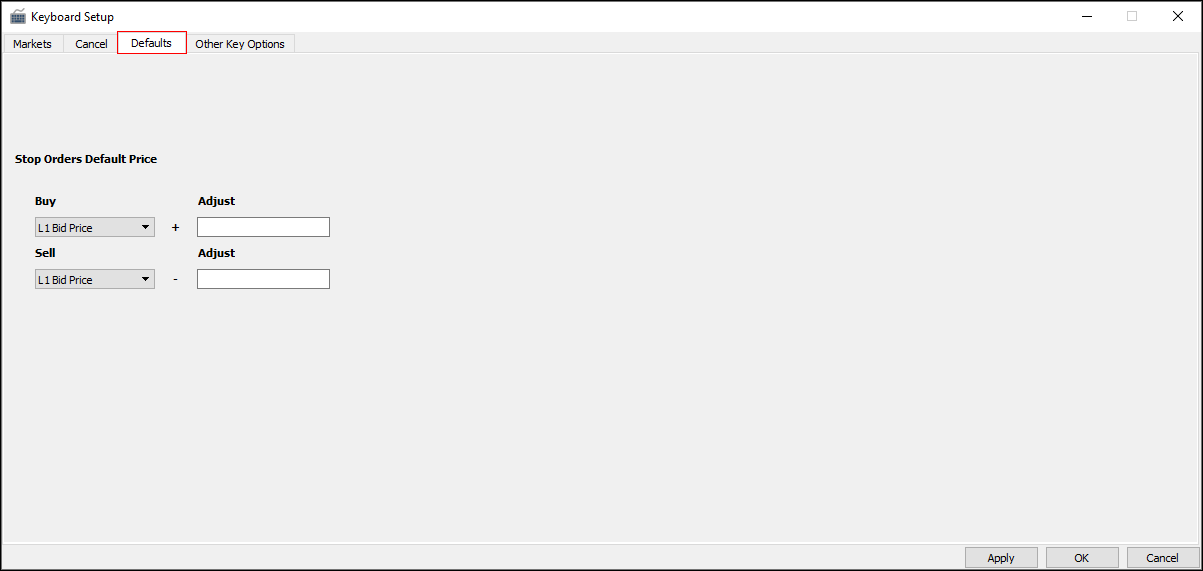
- Stop Orders Default Price: type the Stop Order Type default price adjustment for the Buy side and the Sell side, as needed, and then click OK to save these settings.
Other Key Options
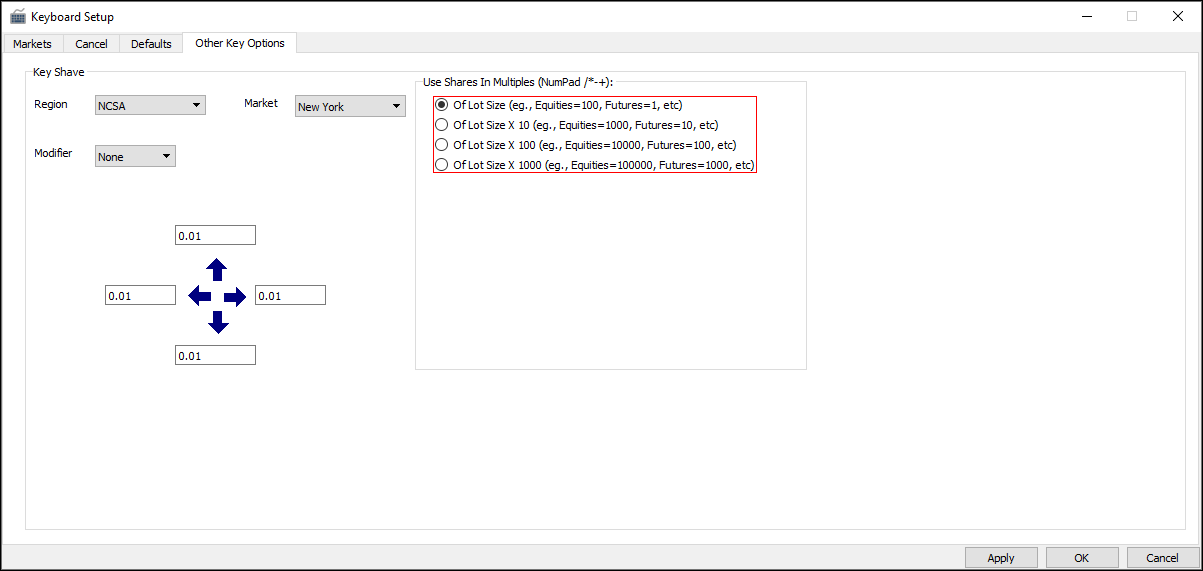
Use the Other Key Options window to set up further key options, such as Key Shave and Use Shares In Multiples.
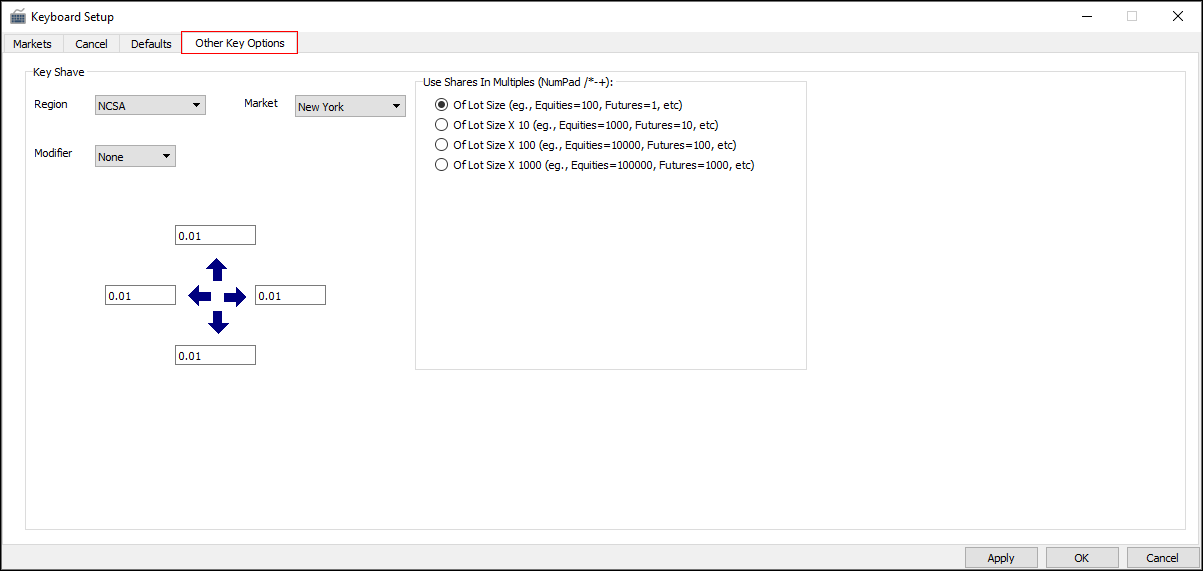
- Region: the region where the market is located
- Market: the market to which the keyboard setup applies
- Modifier: you can choose another modifier key such as Alt, Shift, or Ctrl to use in conjunction with the arrow keys and number keys
- Key Shave Setup: set up the value increment for each arrow key
Multiply by Lot Size
You can use the Use Shares In Multiples feature for futures and equities trading. Pressing the arrow keys in the Order Edit Box sets price increments according to the set lot size.
- Equities: volumes per order can be increased by hundreds, thousands, tens of thousands, and hundreds of thousands
- Futures: volumes per order can be increased by contracts (1, 10, 100, and 1000)
